TSYS | PRIORITY PAYMENT SYSTEMS (PPS)
SOP: CREATE A TICKET
Creating security for your business is important and the use of team members and the proper roles are an important measure, they allow you to pick how much or little of your account you want your users to see.
Each existing team member displays with:
Username - This is the user information they enter during login
Role - If they are set up as a supervisor, clerk, or read only
First Name - The first name of the employee or user
Last Name - The last name of the employee or user
Email - This can be their work or personal email address depending on what you prefer
Active - Yes or No. (If yes, they can log in with their credentials. If no, they are locked out of the system).
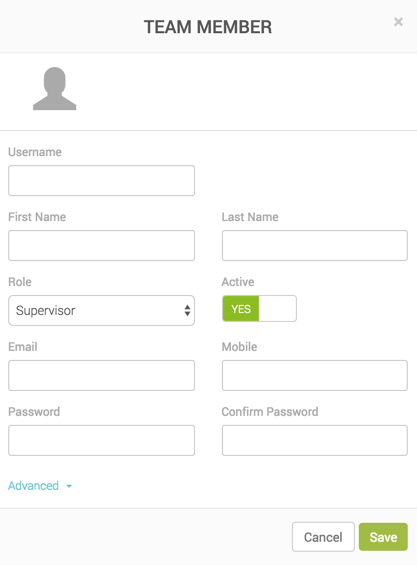
When creating a new team member, you will see the pop-up with the following fields:
Username - The username this individual will have to enter each time they log into MX Merchant.
First and Last Name - This is the first and last name of the user who will be accessing MX Merchant through this username. Please note this is important as this name is reflected within MX Merchant any time the team member makes a change or takes a payment so you can quickly see the team member in charge of the action.
Role - Supervisor, Clerk, or Read Only. This choice will determine what features the user can and can not see.
Active - Yes or No. If you have seasonal employees, you can set them as not active which means their information is still saved however they are unable to sign in to MX Merchant until their account is marked as active.
Email - Users email address
Mobile - Cell number, used for 2 Step authentication when a code is sent to their cell as additional security upon sign in.
Password and Confirm Password - Enter the temporary password for this user (they can change it upon login).
Clicking Advanced in blue text at the bottom of the pop up will allow you to set additional access restrictions for this user. Now you will see the pop-up has expanded with the following fields:
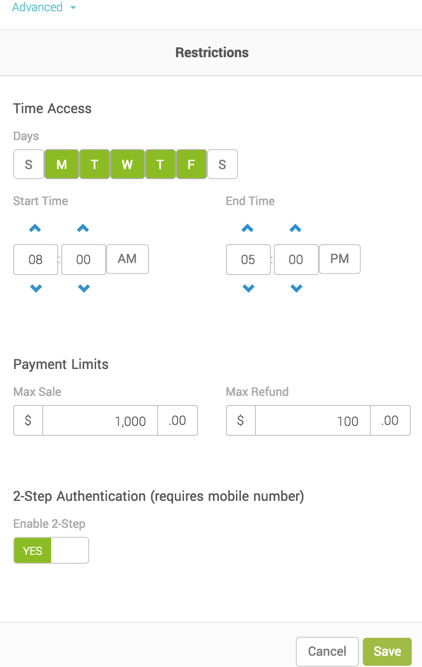
Time Access - Days and time periods this user is allowed to sign in. In the example to the right this user is only allowed to sign in Monday - Friday between the hours of 8:00 AM and 5:00 PM.
Days - To update the days simply select (green) or deselect (white) the days you would like this user to be able to sign in to MX Merchant. The default is 7 days a week (all green).
Start Time and End Time - Now on the days that you have selected above you can now determine what time on those days they can log in. So if you don't want a clerk to go home and have the ability to still run payments or view reports you can limit their access to times they are in the office. The default is 24 hours a day.
Payment Limits - The max sale amount and max refund amount that this user is allowed to process.
Max Sale - This is the dollar amount for a single transaction that you would like to limit this user to. For example, if you limit them to $1,000 and they try to run a $1,500 transaction it will decline the transaction. If you don't want a limit simply clear out all of the numbers in the field. The default is $1,000.
Max Refund - This is the dollar amount for a single refund transaction that you would like to limit this user to. For example, if you limit them to $100 and they try to run a $500 refund it will decline the transaction. If you don't want a limit simply clear out all of the numbers in the field. The default is $1,000.
2-Step Authentication - For additional security you can enable 2-step authentication which requires the user to enter a code that is sent via text message each time they log into MX Merchant. If you have this enabled you must enter a mobile number for this user (found at the top of the pop up).
TO ADD TEAM MEMBERS, FOLLOW THESE STEPS:
- Select Settings on the left-hand vertical menu
- Select Team box to start the process.
- Select Add team Member on the right-hand corner.

- Add/Create team member information.
Username
First and Last name
Role:
- Supervisor - can process cards and look up reports (reconciliation, transactions and batch reports)
- Clerk - Can process cards and see transaction history
- Read Only - have access to the portal but can not process or see reports
Mobile (Optional)
Create and Confirm password (12 characters with a capital letter and a special character. For instance, Welcome12345!) - Select Advance
Update Restrictions
- Highlight days of accessibility
- Leave start time and end time as is
- Update Payment Limits
- Max sale
- Recommend Unlimited
- Max Refund
- Recommend Only office managers or owner issue Refunds
- Max sale
- 2-Step Authentication
Recommend to leave as is NO.